
- Published on
Frontend Development with Docker simplified
- Authors

- Name
- Gábor Soós
- @sonicoder86
Docker is a great tool that helps developers build, deploy, and run applications more efficiently in a standardized way. For frontend applications, we only need the Docker image for local development, because we deploy it to a static hosting provider. In this case, can we live without a custom Docker image? Can we have the same development experience that we had without Docker? Yes, it is easier than you think.
Requirements
Assume an application where we only have to press start, and everything is running. This setup can be any application generated by the React, Vue, Angular CLI.
During development, we will be doing the following steps:
- install dependencies with
npm install - start the application with
npm start - modify a file and check the changes in the browser
- use code-completion of modules in the editor
- add a new dependency to
package.jsonand install it
Custom Docker file
If you search the web for frontend development with Docker, you can find many articles using a custom Docker image. Let's have a look at and see how it works.
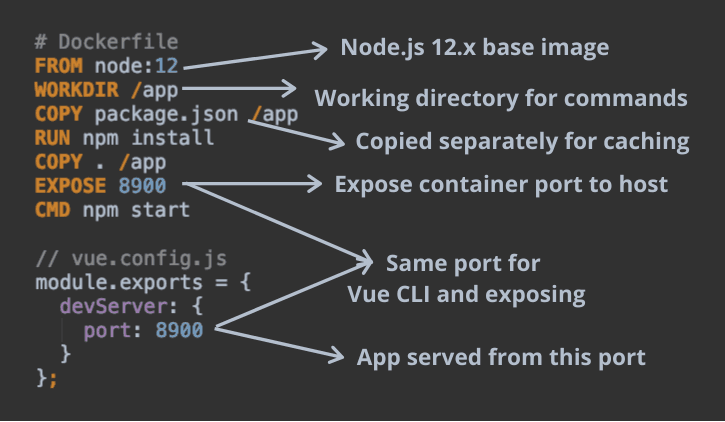
The Docker file starts with defining the base image (Node.js 12.x) on what we will build upon (FROM) and setting the working directory to the /app folder (WORKDIR). Every command starting with RUN or CMD will have this folder as the default working directory.
The next step is to copy the source files (COPY) and install the dependencies. We copy the package.json separately from the rest of the files. Why? Because Docker caches every step of the Dockerfile when building the image multiple times. When don't modify anything and build the image again, it won't do anything as the steps are cached. If we change a Javascript file, Docker will run the commands from COPY . /app. When we modify the package.json file, Docker will rerun the commands from COPY package.json /app.
By default, applications running inside the container on a specific port are not available on the host machine. We have to make the port available (EXPOSE). Only after this can we type the URL in our browser (http://localhost:8900) and see the result.
To run this image, we have to build it and run the created container.
# Build the image: docker build -t <image-name> <relative-path-to-dockerfile>
docker build -t client .
# Run the image: docker container run -p <host port:container port> <image-name>
docker container run -p 8900:8900 client
Disadvantages
The above Docker image works but has multiple drawbacks:
Files generated inside the container are not visible from the host machine, only inside the container. It means that we won't see the
node_modulesfolder on our host machine, and because of this, we lose code-completion in the editor. We can't commit the generatedpackage.lock.jsonto source control because it is not available on the host machine also.We have to stop, build, and rerun the container on dependency and file changes. We lose the ability of live-reload.
Meet Docker Compose
Docker can build single images and run the built containers. Docker Compose steps a bit further as it can build and run multiple images at the same time. In this tutorial, we won't be using the numerous build capability; we'll use it only to overcome the disadvantages of the previous example.
While we can use the previous Dockerfile to run with Docker Compose, we will use it in a way to skip the writing of a custom image.
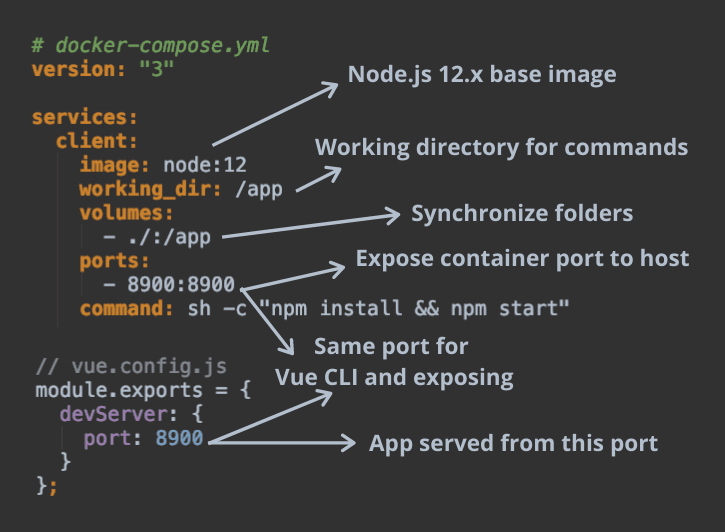
Instead of defining the image with a sequence of commands, Docker Compose uses the YAML config file format. Under the services key, the image for the Vue application is named client. It is the equivalent to the naming in the docker build -t <image-name> command. The description starts the same way here: defining the base image (image) and setting the working directory (working_dir).
The key difference comes from the volumes property. By using it, the local folder is synchronized with the container. If we execute the npm install command in the container, the node_modules folder will appear on the host machine also: we get the code completion and the lock file.
The application starts in the container also (command: sh -c "npm install && npm start"), exposing the port to the host machine is necessary for browser access (ports).
To run this setup, we have to build it and run the built container.
# Build the image and start the container
docker-compose up
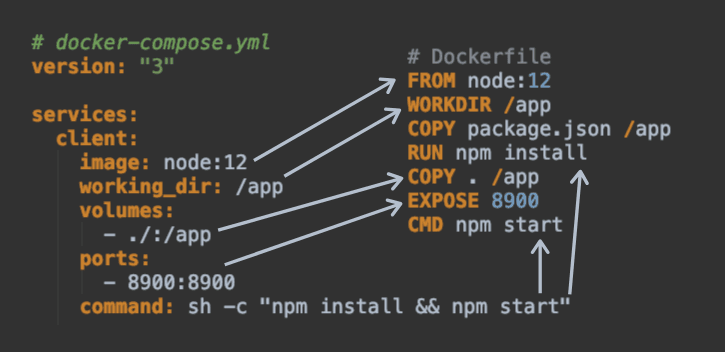
If you look at the two solutions they are nearly identical. There is a great correlation between the commands in the Dockerfile and the configuration fields in the docker-compose.yml config file. The only difference is how they handle mounted files and this is what solves our synchronization issue.
Summary
When doing local development it is important to have a fast feedback loop and code completion. If we go with the pure Docker solution we lose both. We have to ask for the help of Docker big brother Docker Compose to help us with its folder synchronization. By migrating our setup to Docker Compose we get back the speed and code completion. I hope this trick helps you and saves a ton of development time.
Special thanks to iben for helping me with the setup.